8 · The web interface
The web interface is your ESPuino's control center. Practically everything that can be configured gets configured here – from card assignments through Wi-Fi to firmware updates – and it's also where you control ongoing playback. This chapter walks you through every area once. You don't need to absorb it all at once; think of it as a reference where you look up exactly the tab you need right now.
You reach the web interface in your browser – most conveniently via the hostname
(http://espuino.local with mDNS active), otherwise via the IP address. How to get there the first
time is described in chapter 7 · First start.
What applies everywhere
A few elements appear on every page, so here they are up front:
- A heart icon pulses in the top right – the connection indicator, called the "heartbeat" in the forum (#4583, German-language). It monitors the connection between your web browser and ESPuino: the open page sends a small request to the device every three seconds; if a reply comes back, the heart pulses green, and if it doesn't, it turns red. That way you always know whether the page is still in contact with your ESPuino.
- A question mark sits next to many input fields. Clicking it opens a short help text – so if you're ever unsure what a setting does, the answer is usually just a click away.
- The stack icon at the very top right gives you a menu with language selection (German, English, French), dark mode, information (firmware version, memory, battery), the log (console output right in your browser), and restart and power off.
- Saving always happens per section, via that section's own button. Its label tells you exactly what gets saved.
Control tab
The Control tab is the remote control in your browser. Here you see – as long as the title or web stream provides one – the cover art and info for what's currently playing, and operate playback with the familiar transport buttons (first title, previous, play/pause, next, last). The volume slider takes effect immediately, and the equalizer icon opens three sliders for bass, mid, and treble.
Two small things are especially handy: the progress bar is clickable – clicking it jumps straight to that point in the title. And run a modification triggers any modification (sleep timer, repeat, button lock, …) directly, without placing a card at all.
RFID tab
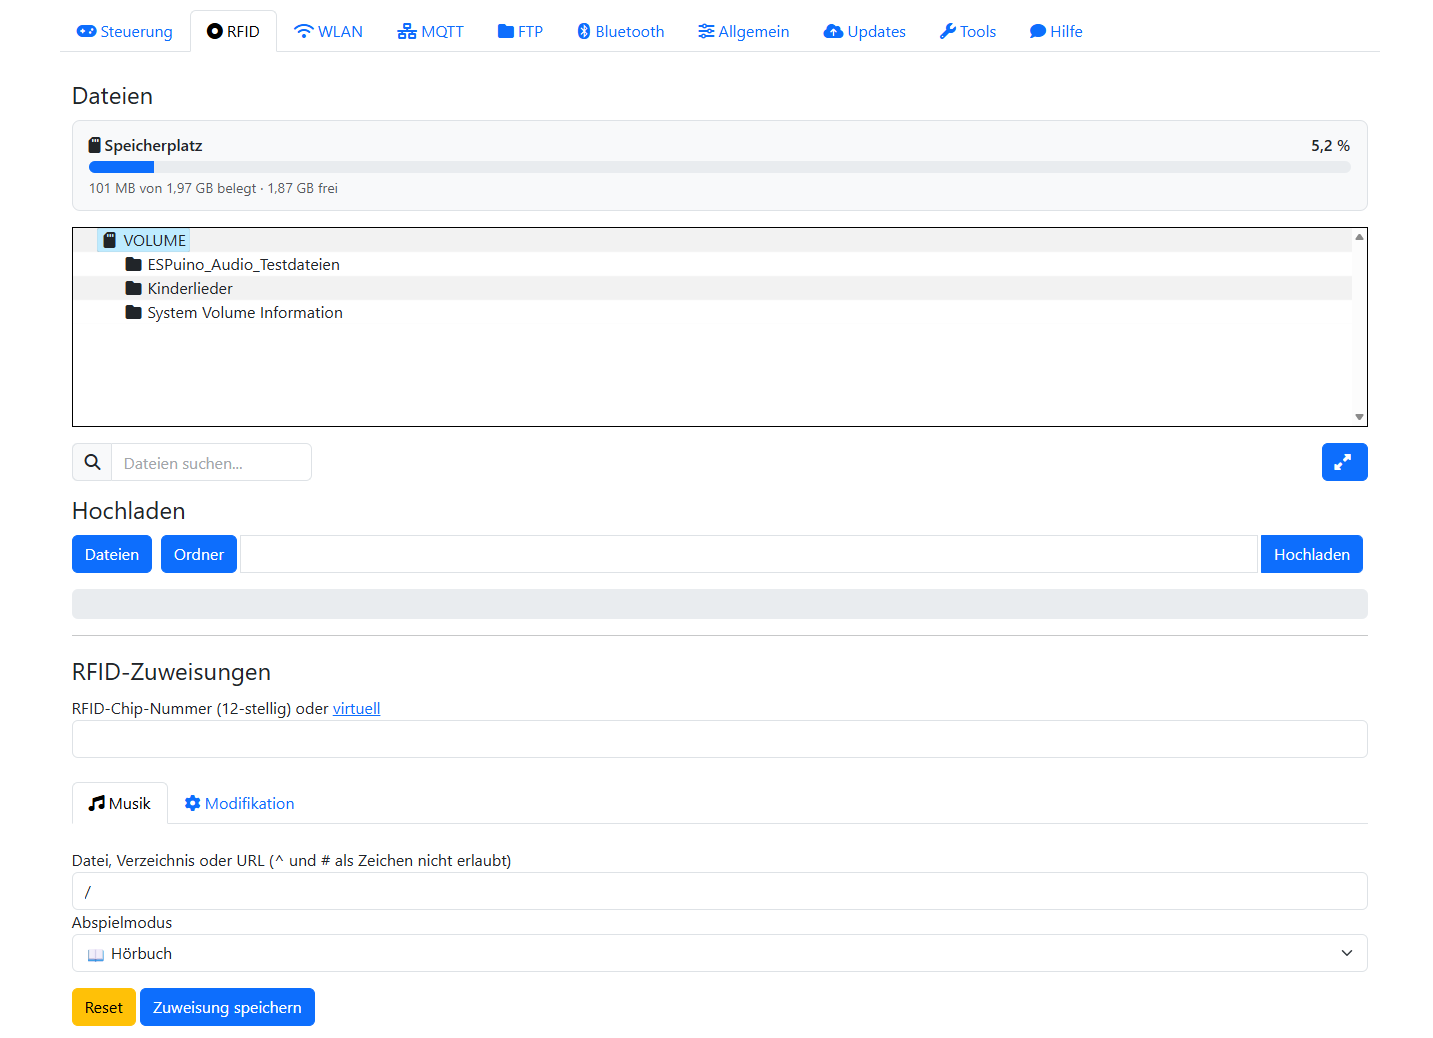
This tab is the heart of the interface, since this is where you link cards to content. It consists of two areas stacked on top of each other: the file browser and the actual assignment.
The file browser
The file browser shows the contents of the SD card. The search field lets you filter, upload brings individual files or entire directories (including subfolders) onto the ESPuino, and a right-click (on a phone: long-press) on an entry opens a context menu for creating, playing, refreshing, renaming, deleting, and downloading.
Assigning a card
In the section below, you assign content to a card, in four steps:
- RFID chip number: if you place a card, its number is filled in automatically. You can also enter it by hand or use a virtual card (German-language forum).
- In the Music tab, pick a file or folder in the file browser and set the playback mode
(see the table). Choosing web radio conveniently pre-fills the path field with
http://. - In the Modification tab, you assign an action to the card instead.
- Save – done.
Playback modes
The following table lists the modes in the order they appear in the dropdown. The technical IDs are in the appendix.
| Mode | Meaning |
|---|---|
| 🎵 Single title | Exactly one file, once. |
| 🎵🔁 Single title (loop) | Repeat one file indefinitely. |
| 🎲💤 Random title from a folder, then sleep | A random title, then deep sleep – the ideal bedtime card. |
| 📖 Audiobook | Titles from a folder, sorted – or just a single file; the last position is remembered. |
| 📚 Audiobook, recursive | Like audiobook, including subfolders; position is remembered. |
| 📖🔁 Audiobook (loop) | Audiobook, starts over from the beginning after the last title. |
| 📁 All titles (sorted) | Folder in sorted order, without position memory. |
| 🌳 All titles + subfolders (recursive, sorted) | As above, including subfolders, without position memory. |
| 📁🔀 All titles (shuffled) | Folder in random order. |
| 🌳🔀 All titles + subfolders (recursive, shuffled) | Shuffled across folder and subfolders. |
| 📁🔁 All titles (sorted, loop) | Sorted, endless. |
| 📁🔀🔁 All titles (shuffled, loop) | Shuffled, endless. |
| 🎲📁 Random subfolder (sorted) | A random subfolder, sorted. |
| 🎲📁🔀 Random subfolder (shuffled) | A random subfolder, shuffled. |
| 📻 Web radio | A stream URL instead of a file. |
| 📃 List (.m3u) | The entries of a local .m3u – files and web streams mixed. |
| 🌐 MediaHub | Content and playback mode come from the selected MediaHub server. |
Modification cards – all options
Instead of music, a card can be assigned an action. You'll find the same catalog, incidentally, in the Control tab under "run a modification", where you trigger the action directly without a card. The technical IDs are in the appendix.
Locking & sleeping
| Action | Effect |
|---|---|
| 🔒 Button lock | Locks the buttons and rotary encoder on the device, so accidental presses don't trigger anything. |
| 💤 Sleep now | Puts ESPuino into deep sleep immediately. |
| 💤 Sleep after 15 min / 30 min / 1 h / 2 h | Starts a sleep timer; ESPuino shuts down after the chosen time. |
| 💤 Sleep at end of title | ESPuino falls asleep once the current title finishes. |
| 💤 Sleep at end of playlist | ESPuino falls asleep once the current playlist has finished. |
For all sleep modes, ESPuino dims the LEDs – so you can tell at a glance that a sleep timer is active.
Repeat
| Action | Effect |
|---|---|
| 🔁 Repeat playlist | Repeats the entire playlist endlessly. |
| 🔂 Repeat title | Repeats the current title endlessly. |
Light, radio & services
| Action | Effect |
|---|---|
| 🌙 Dim LEDs (night mode) | Dims the Neopixels permanently – pleasant, say, in a darkened child's room. |
| 📶 Wi-Fi on/off | Turns Wi-Fi on or off (off saves power and allows purely offline operation). |
| 💡 Ambient light | Toggles a permanent mood-lighting effect for the LEDs. |
| 📁 Enable FTP | Starts the FTP service (until the next restart). |
| 🔊 BT speaker | Switches ESPuino into Bluetooth speaker mode (BT sink): it receives audio from a paired device, e.g. your phone, and plays it. |
| 🎧 BT headphones | Switches ESPuino into Bluetooth headphone mode (BT source): it sends its audio to paired Bluetooth headphones or a speaker. |
| 🔀 Switch mode | Cycles through the operating modes in order (normal ↔ Bluetooth). |
The three Bluetooth actions are only available with firmware built with Bluetooth support.
You can lock yourself out with "Wi-Fi on/off"
Turning off Wi-Fi also takes the web interface with it – and that's exactly where you'd normally turn it back on. The only way back is then via the same route you used to turn it off: the modification card (or a button combination or button you assigned this action to). So keep that card somewhere safe before you turn off Wi-Fi.
Announcements
| Action | Effect |
|---|---|
| 🌐 Announce IP address | Announces the current IP address via speech – handy for finding out the address for the web interface. |
| 🕒 Announce time | Announces the current time. |
Playback control as a card
| Action | Effect |
|---|---|
| ⏯ Play/Pause | Pauses playback or resumes it. |
| ⏮ / ⏭ Previous / next title | Jumps to the previous or next title. |
| ⏪ / ⏩ First / last title | Jumps to the first or last title of the playlist. |
| 📁 Next / previous folder | Jumps a folder forward or backward (recursive modes only). |
| » / « Seek forward / backward | Seeks a few seconds forward or backward. |
Virtual cards & other
| Action | Effect |
|---|---|
| 🏷 Virtual card 01–10 | Refers to one of ten virtual cards – assignments that can be triggered without a physical card (say, via a button combination or MQTT). |
| 🗑 Delete assignment | If you assign this action to a card, the next time it's placed, that card's existing assignment is removed. |
Wi-Fi tab
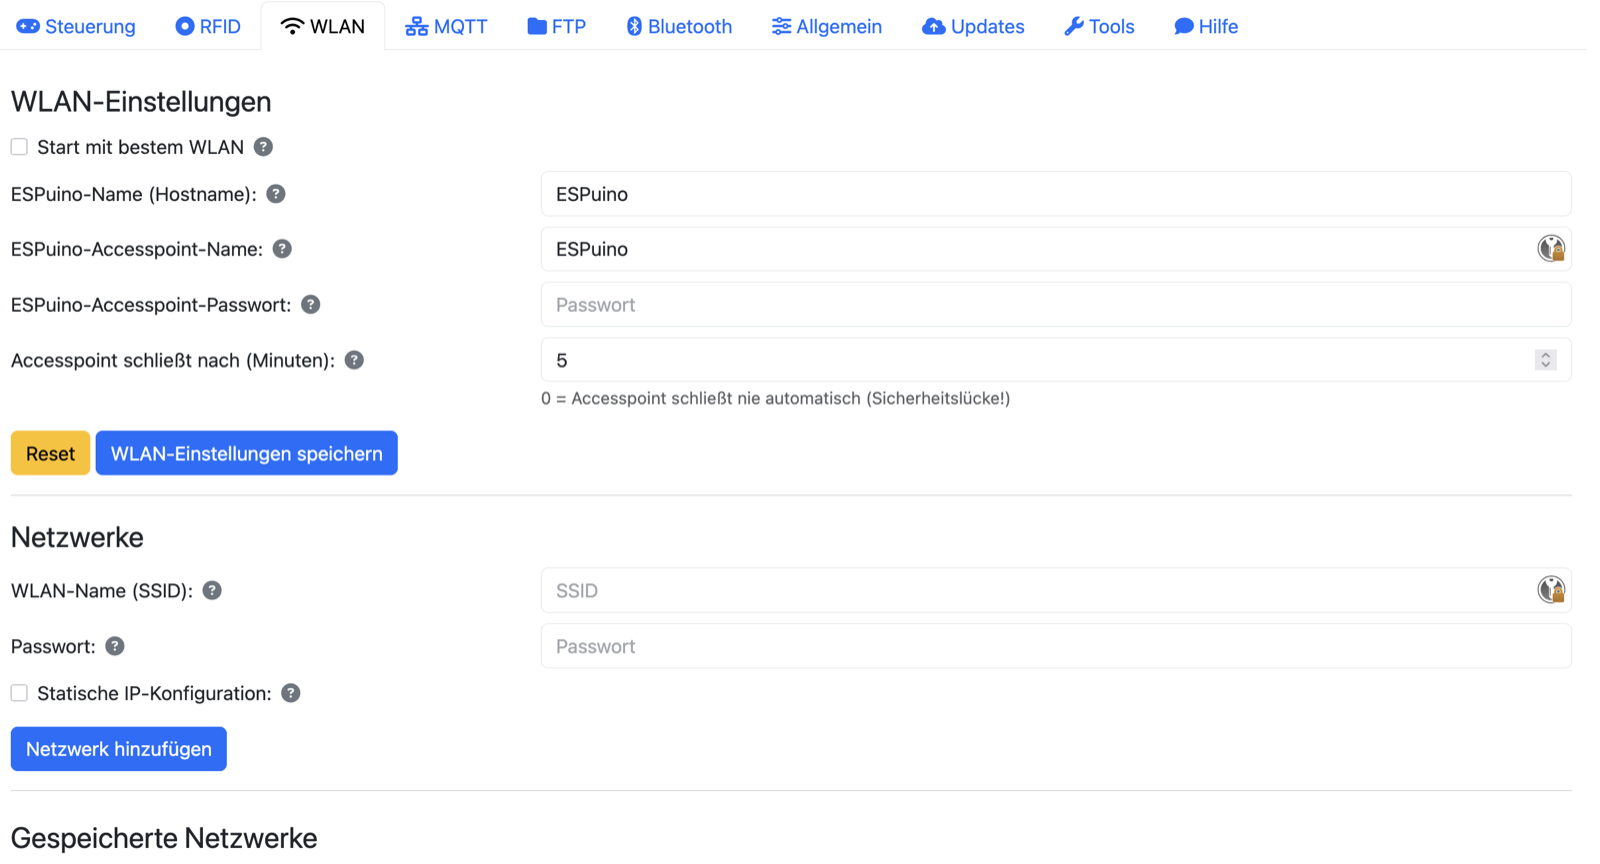
Here you manage everything related to the network connection. Under Wi-Fi settings, you decide whether ESPuino picks the strongest of several known networks on startup, what the hostname is, and – for the setup case – what the access point is called, whether it has a password, and when it closes automatically. Under networks, you store your Wi-Fi networks; several can be saved, which is handy if ESPuino occasionally travels along to the grandparents'. Optionally, you can set a static IP per network. Finally, saved networks lists every stored Wi-Fi network; the one currently connected is highlighted, and the trash icon deletes entries.
Access point timeout: please don't leave it at 0
Some background: ESPuino only opens the setup access point if it couldn't log into any known Wi-Fi network – it's a stopgap for initial setup. This AP is unprotected by default, and as long as it's open, anyone can connect to it and do whatever they like in the web interface. If it's only open briefly, that's acceptable. A timeout of 0, though, means ESPuino never closes the AP on its own – giving you a permanent security hole. So don't leave the value at 0 (or at least set an AP password).
Use a static IP with care
Only set a static IP if you know what you're doing. If the configuration doesn't match your network, ESPuino may become unreachable.
MQTT tab
MQTT support is compiled in by default, so this tab is normally present – it's only missing if the firmware was deliberately built without MQTT.
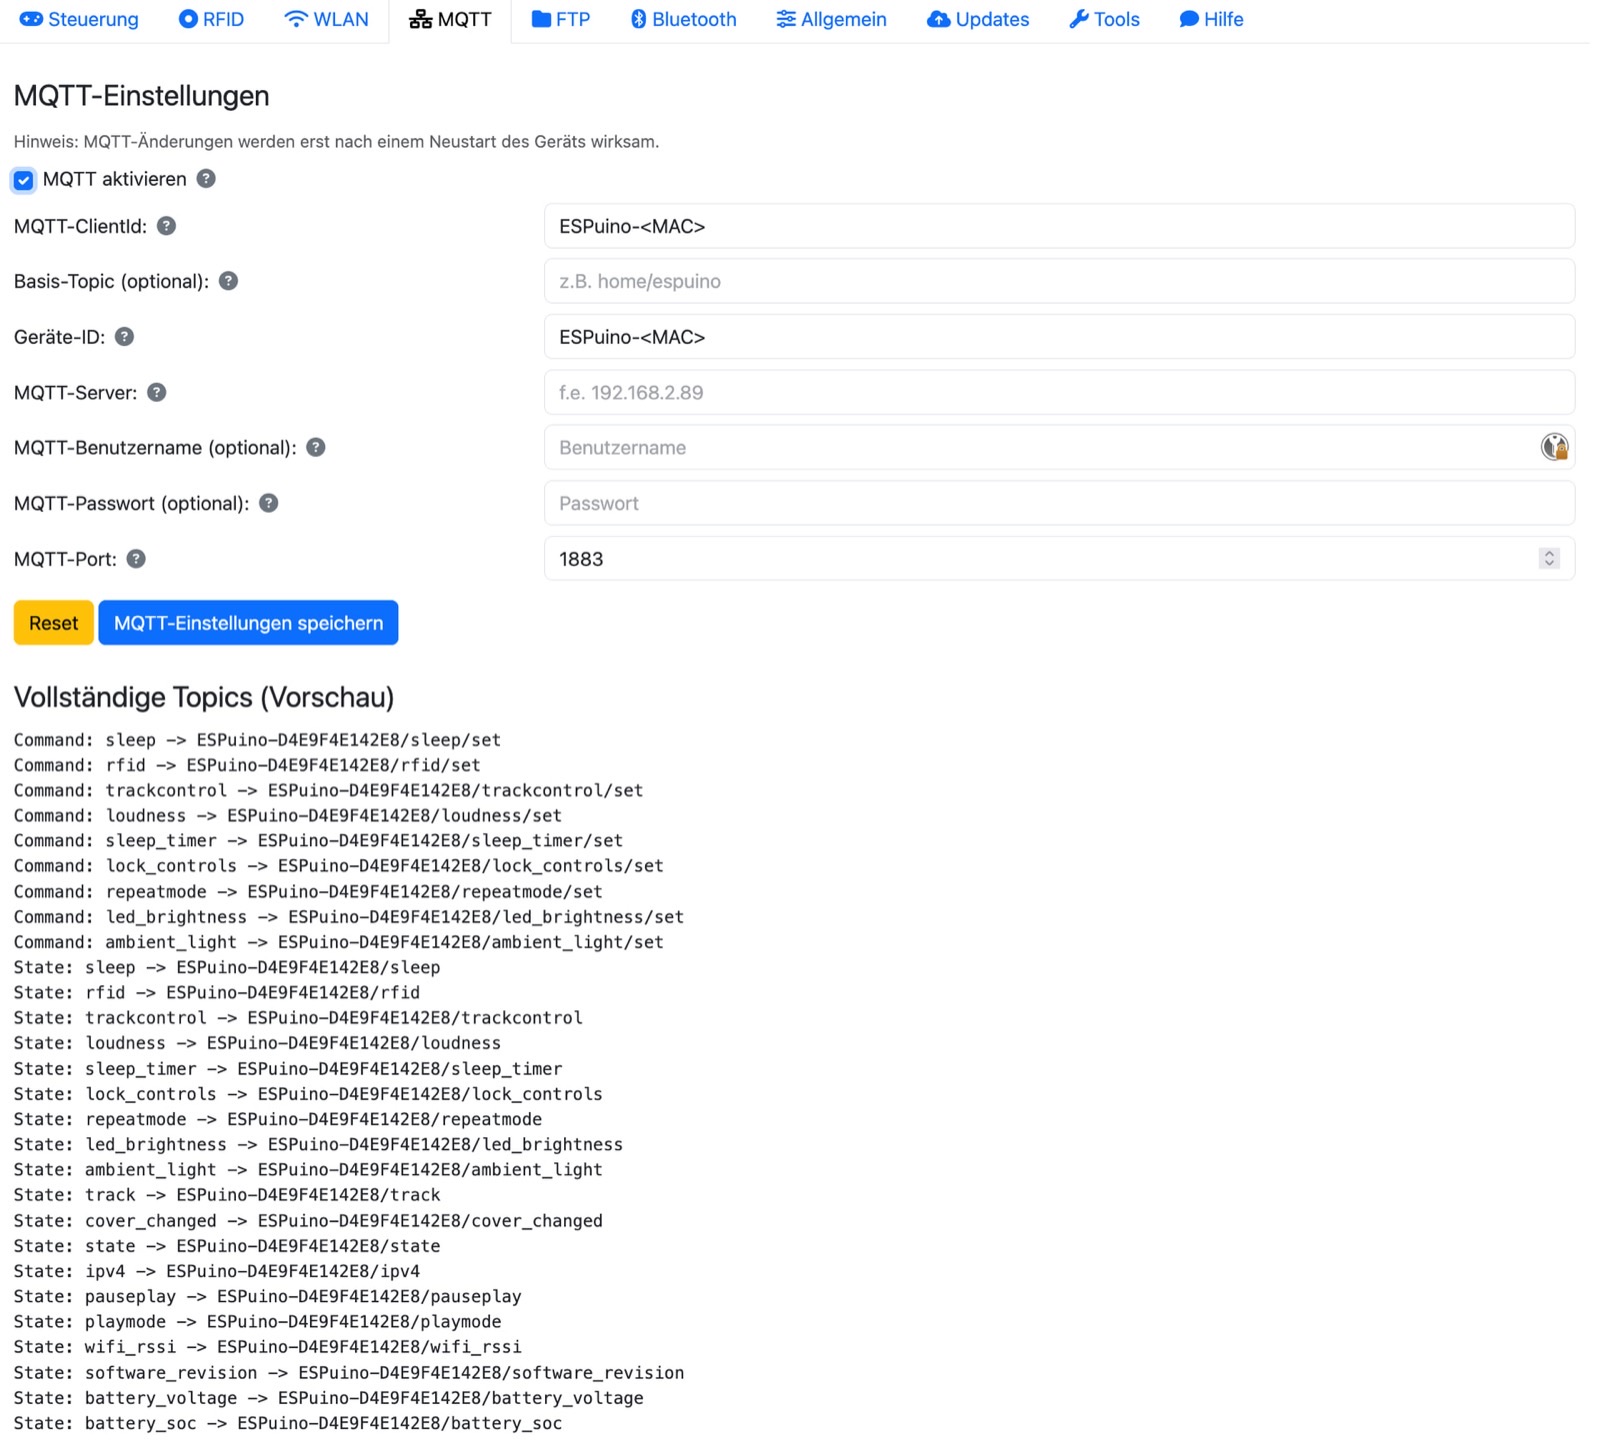
Here you connect ESPuino to your MQTT broker, say for Home Assistant,
ioBroker, or openHAB. You enable MQTT and
enter a client ID, an optional base topic, the device ID, the server, optionally a username and
password, and the port. In the client ID and device ID, you can use the placeholder <MAC> – it's
automatically replaced with the MAC address, which is invaluable when running several ESPuinos.
Conveniently, below the fields you see a live preview of the topics that result from your
entries. Which topics exist is listed in the appendix.
Restart required
Changes to the MQTT settings only take effect after a restart – the interface offers one right after saving.
FTP tab
FTP support is compiled in by default, so this tab is normally present – it's only missing if the firmware was deliberately built without FTP.
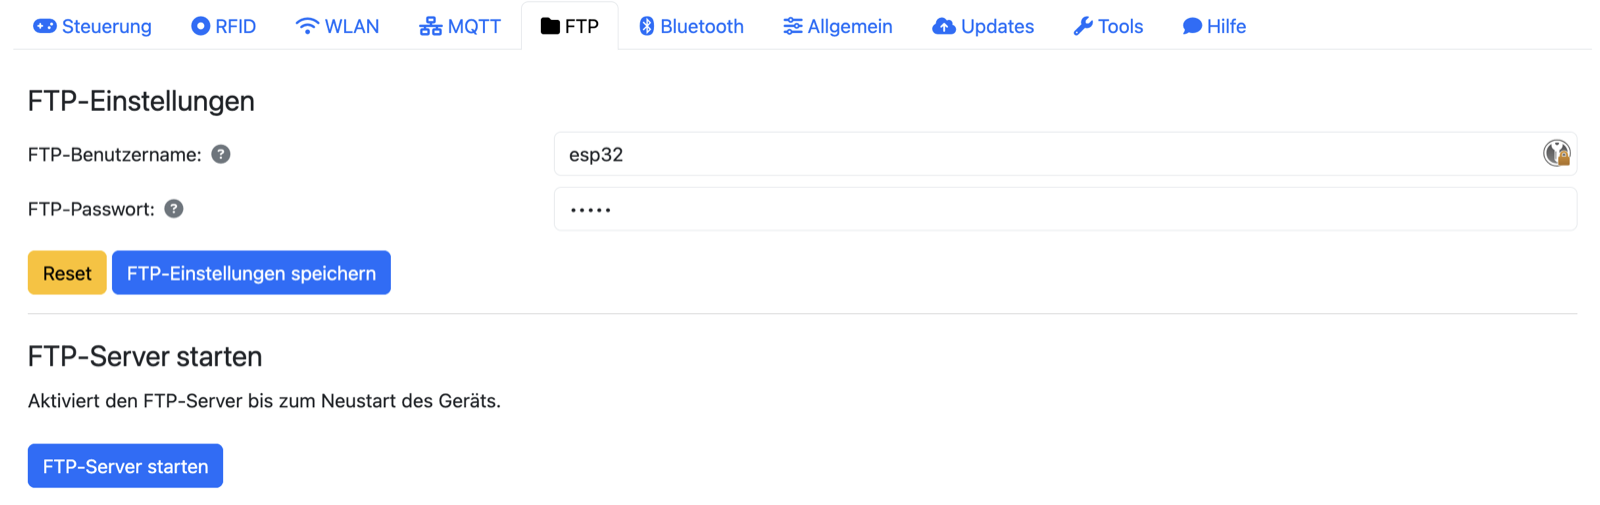
Here you set the username and password for FTP access. For memory reasons, the FTP server doesn't run all the time: you start it when needed via the start FTP server button (or at the device via a button combination), and after the next restart it's off again.
For large amounts of data
For large amounts of data, the web upload is now the better choice – it's been optimized and is nowadays faster than FTP (which hardly anyone uses anymore).
Bluetooth tab
Only visible if the firmware was built with Bluetooth support.
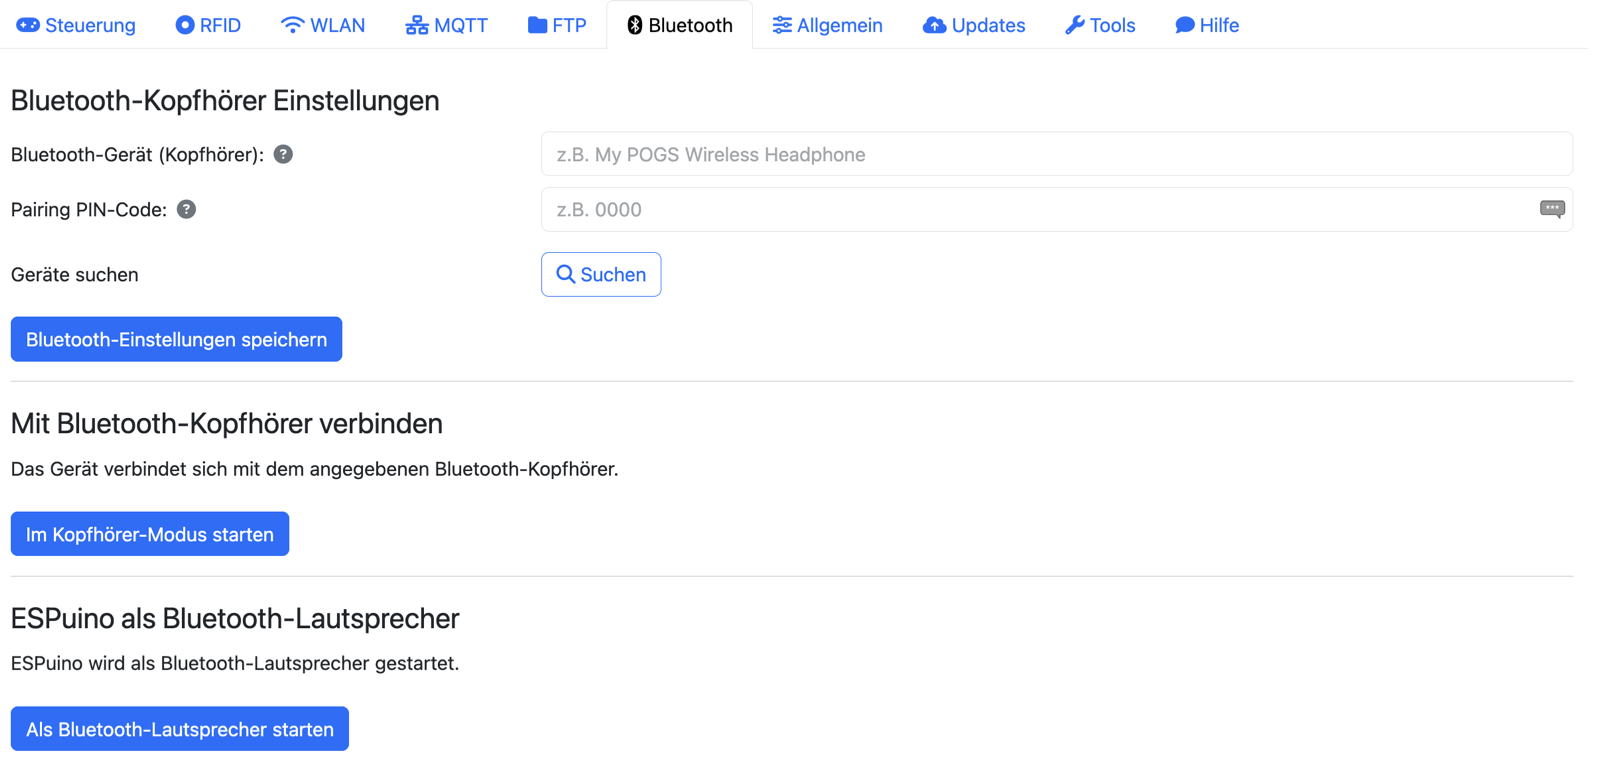
ESPuino can do Bluetooth in two directions. In Bluetooth headphones mode, ESPuino sends audio to a Bluetooth device – you enter your headphones' name, or, even easier, click search for devices and pick your device from the results list (a PIN code field is available if needed). In Bluetooth speaker mode, ESPuino conversely becomes the speaker itself, which you stream to from your phone. In Bluetooth mode, the tab shows a button to switch back to normal mode; alternatively, just placing an unknown RFID card is enough.
Bluetooth and Wi-Fi
Bluetooth and Wi-Fi run in parallel. That parallel operation is memory-tight and untested, though – more on that in chapter 9 → Operating modes.
General tab
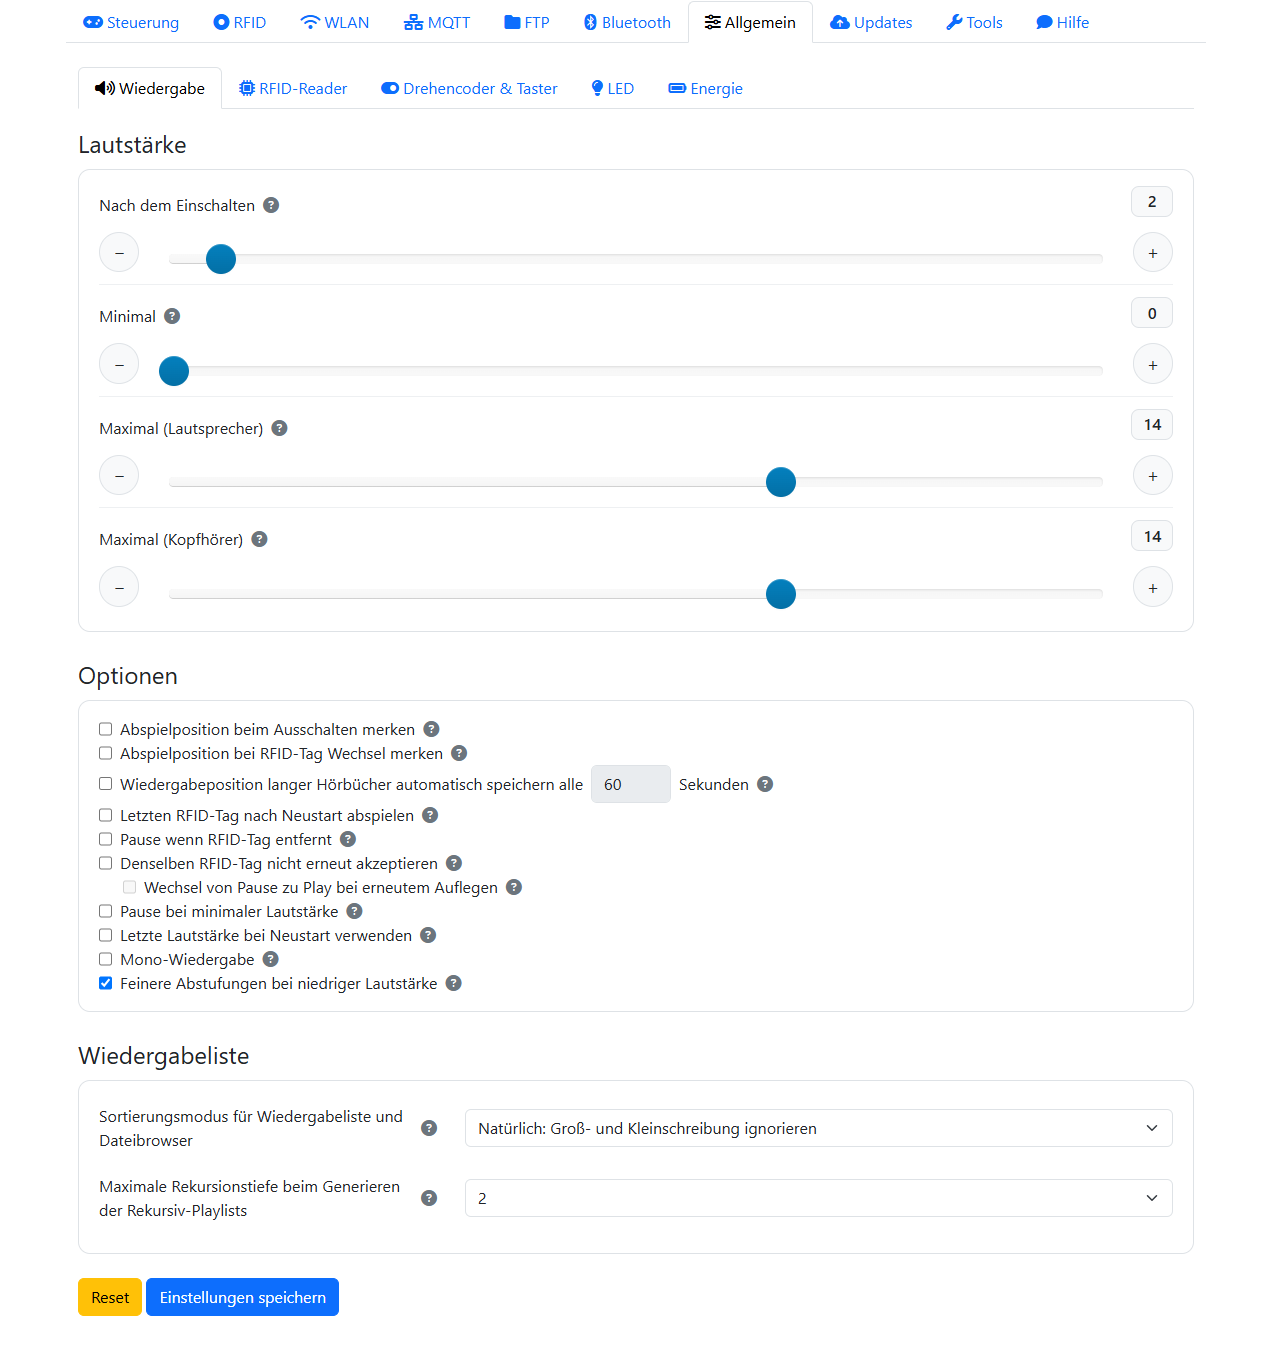
The general settings are visually split into five sub-groups (playback, RFID reader, rotary encoder & buttons, LED, power). Each has its own save and reset button, but don't let that fool you: all five belong to one shared form. Clicking save therefore stores all general settings at once – not just the sub-group currently visible. So you don't need to save each sub-group separately.
Playback
Here you set the basic playback behavior. Under volume, you set the startup volume and the maximum values separately for speaker and headphones, plus a minimum volume so the box can never be muted entirely. Under playlist, you choose the sort mode and the maximum recursion depth.
A word about position memory up front, since several of the options depend on it: ESPuino only remembers the last-heard position in audiobook mode, and by default only at the natural points – when pausing and when changing titles. The two "remember…" options below extend this with additional save points.
The options section is a collection of behavior toggles – each also has a help text behind its question mark:
| Option | Effect |
|---|---|
| Remember position on power-off | Additionally saves the audiobook position when powering off. |
| Remember position on card change | Additionally saves the position when switching to a different card. |
| Resume last card after restart | Automatically resumes the last-played card after a restart. |
| Pause when card is removed | Pauses when the card is taken off the reader (RC522 and PN5180 – see warning below). |
| Don't re-accept the same card | Ignores placing the same card again; optionally pause↔play instead of restarting. |
| Pause at minimum volume | Pauses once the volume reaches the minimum. |
| Restore last volume | Restores the last-used volume after a restart. |
| Mono playback | For builds with only one speaker. |
| Finer steps at low volume | Switches to logarithmic volume calculation – helps if the steps feel too coarse at the low end of the volume range. |
There's also the option "Automatically save playback position of long audiobooks every n seconds", which has ESPuino save the position in audiobook mode periodically – meant for long chapters (files of 5 minutes or more), so a sudden power loss doesn't cost an entire hour of progress. It's off by default; 30–60 seconds is recommended.
Periodic saving wears on flash memory
Every save writes to flash memory, and flash wears out a small amount with every write. So don't pick an unnecessarily short interval, and only use this feature where it's really worthwhile (long audiobooks). For short titles that already save at every title boundary anyway, it doesn't gain you anything.
The "pause when card is removed" option can cause trouble
It's popular (card sits there, taking it off pauses), but tricky: if the card briefly goes undetected in the meantime, playback pauses unintentionally – one of the most common causes of sporadic dropouts. If this happens unreliably for you, reduce the card-to-reader distance, increase the PN5180's debounce setting if you're using one, or turn the option off. (The option itself works with both RC522 and PN5180; only the debounce setting is specific to the PN5180.)
RFID reader
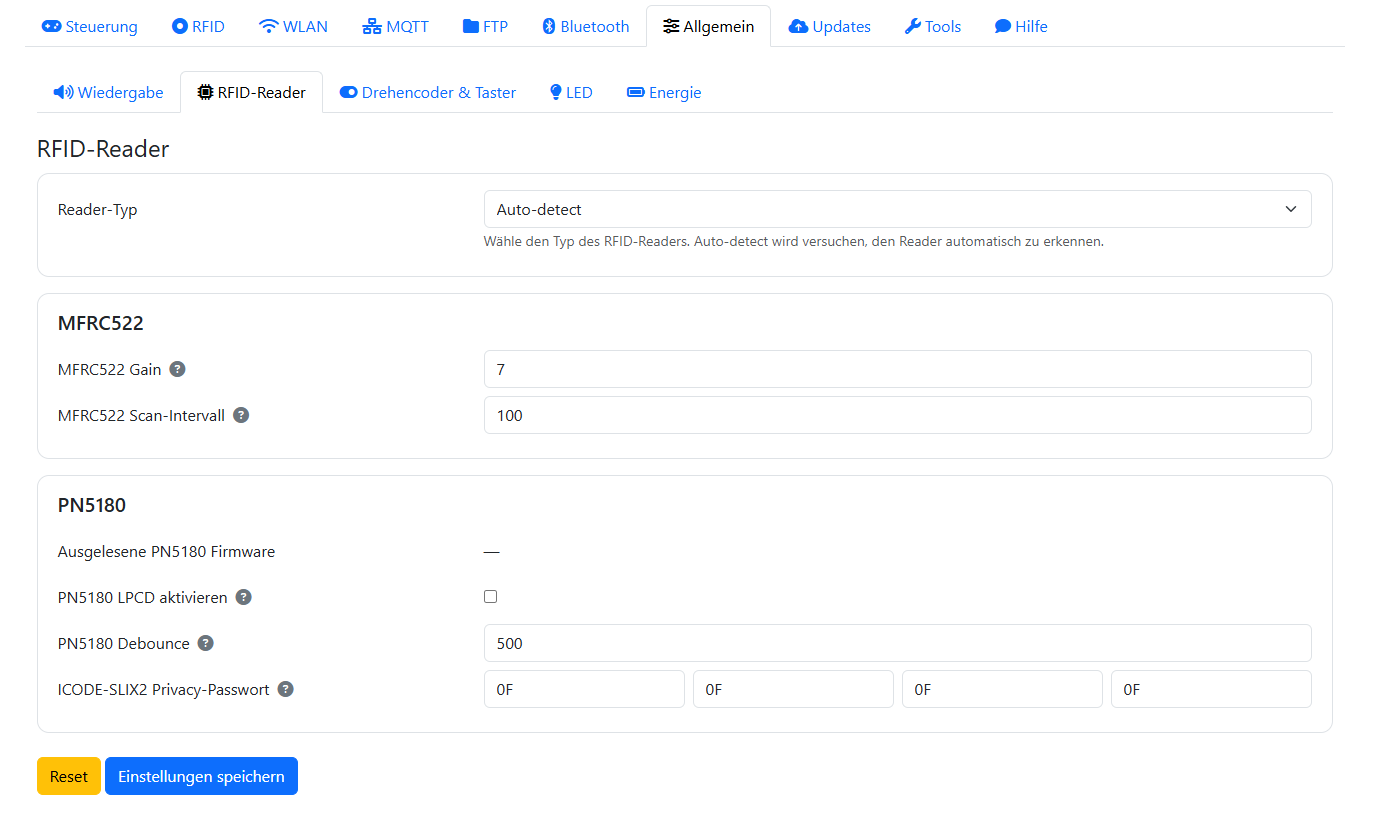
This sub-group is about the card reader:
| Setting | Meaning |
|---|---|
| PN5180 LPCD | Wake from deep sleep by placing a card. Only with the PN5180 and matching solder bridges set – on the Complete, you need to adjust solder bridges JP1/JP8 for this (chapter 5); with the MFRC522, this option is grayed out. Limitations: chapter 12. |
| Reader type | Auto-detect (default), MFRC522 (SPI or I²C), or PN5180. |
| MFRC522 gain | Sensitivity of the MFRC522 (0–7, default 7). |
| MFRC522 scan interval | Time between two MFRC522 polls, in milliseconds (default 100 ms). |
| PN5180 debounce | How long a card must go continuously undetected before it's considered removed (default 500 ms). |
| ICODE-SLIX2 privacy password | Four-byte password (hexadecimal values 00–FF only) to disable privacy mode on protected ICODE-SLIX2 tags. |
Restart required
Changes in this sub-group only take effect after a restart.
Rotary encoder & buttons
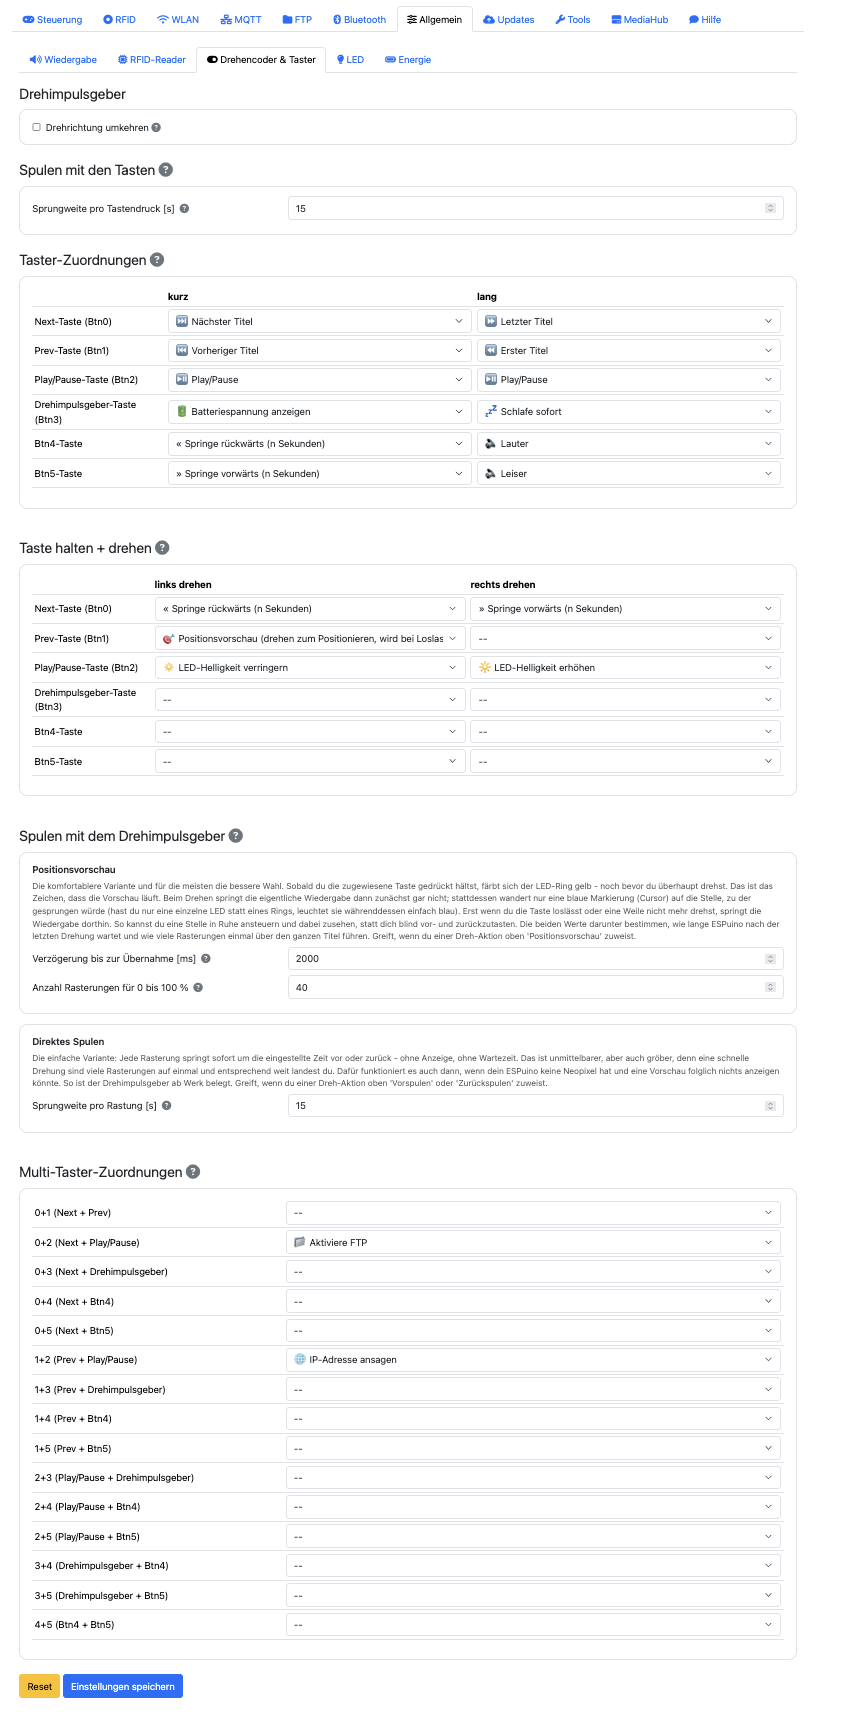
Here you set what the controls do. Important to understand: everything you set here goes into internal memory (NVS) and overrides the default mapping baked into the firmware – so you can adjust the entire mapping without rebuilding the firmware.
For the rotary knob itself, there's reverse rotation direction, in case turning right makes
things quieter instead of louder for you – plus the seek step sizes further below. Below that, a
table lets you assign an action for short and long press to each of the six buttons (Btn0–Btn5);
-- means "no action". In addition, actions can be assigned to simultaneously pressed pairs of
buttons (all 15 combinations from 0+1 to 4+5, one action each) – handy for rarely used functions
like restart or starting FTP, without sacrificing a dedicated button for them.
Less is often more
Technically you can assign a lot here – but hardly anyone will remember a dozen combinations. Better to stick to one or two that are genuinely useful. Also keep in mind: children in particular sometimes happily mash all the buttons at once and trigger actions you weren't expecting – or have long since forgotten about. A clear, simple mapping saves you guesswork later.
Lockout trap: "disable Wi-Fi" on a button
One of the selectable actions turns Wi-Fi off. If you assign it to a button or button combination and it gets triggered (possibly by accident), you lock yourself out of the web interface – no Wi-Fi means no web interface, and no web interface means no way left to turn Wi-Fi back on. The only way out then is to erase the flash, which overwrites the NVS, and all settings are gone. That's exactly why the Wi-Fi-toggle combination is disabled by default. If you want Wi-Fi to be toggleable at all, better put that on a modification card instead – just don't misplace it. 😄
The available actions largely match the modification-card catalog, plus a few actions that only make sense as buttons: volume up/down/reset to initial volume, show battery voltage, stop and restart, sleep after five titles, and a debug display of task load. The default mapping ESPuino ships with is listed in chapter 9 → Buttons.
Seek step sizes
How far ESPuino seeks depends on what you use to seek – so there are two separate blocks for this on this page.
Seeking with the buttons concerns the buttons you've assigned the "seek forward" or "seek backward" action to. Here you set how many seconds a single button press jumps (1–120, default 30).
Seeking with the rotary encoder concerns the "hold button + turn" gesture. There are two mutually exclusive variants for this – which one applies is decided in the rotation-action table further up, by assigning the gesture either "position preview" or "seek forward"/"seek backward":
| Variant | Settings | Default |
|---|---|---|
| Position preview (the more comfortable one) | Delay before committing – how long ESPuino waits after the last turn before it jumps. Number of detents for 0 to 100% – how many detents span the entire title. |
2000 ms 40 |
| Direct seeking (active by default) | Step size per detent – how many seconds each individual detent jumps immediately. | 10 s (1–60) |
How the two variants differ in practice is covered in chapter 9. All values take effect immediately after saving – no restart is needed for this.
LED
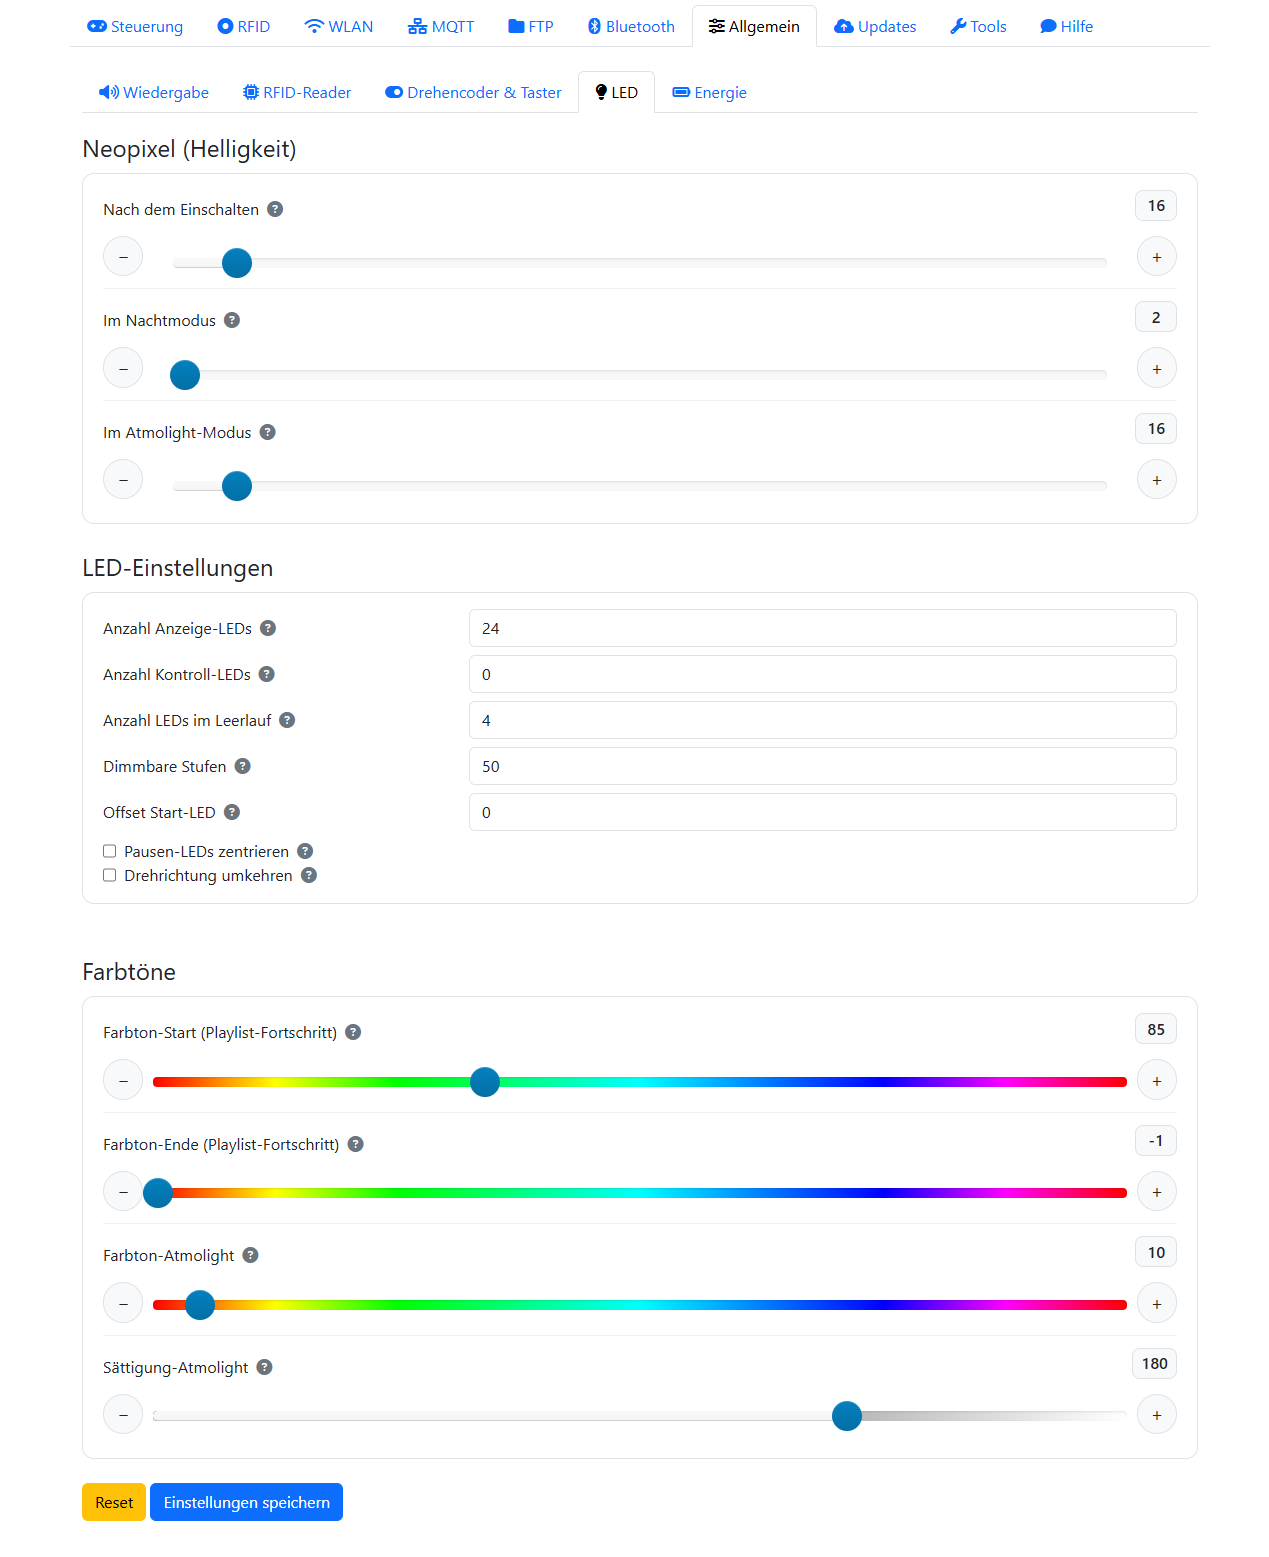
Here you configure the Neopixels. Brightness can be set separately for normal operation, night mode, and ambient light. Under LED settings come the details:
| Setting | Meaning |
|---|---|
| Number of display LEDs | How many LEDs show status and progress. |
| Number of control LEDs | Additional LEDs, each with a freely chosen color. |
| Idle dots | Number of dots in the idle animation. |
| Progress color gradient | Hue for the start and end of the progress display. |
| Ambient light | Hue and saturation of the ambient light. |
| Dimmable steps | Granularity of the brightness steps. |
| Start LED offset | From which physical LED the display starts (see tip). |
| Pause centering | Centers the pause display. |
| Rotation direction | Reverses the direction of the effects. |
Positioning the first pixel
If the ring sits "rotated" in the enclosure, the start LED offset lets you set which physical LED the display starts from – so you can align the ring's zero point with how it's mounted, without resoldering anything (forum #4670, German-language).
A changed LED count, by the way, is applied by ESPuino via an automatic restart.
Power
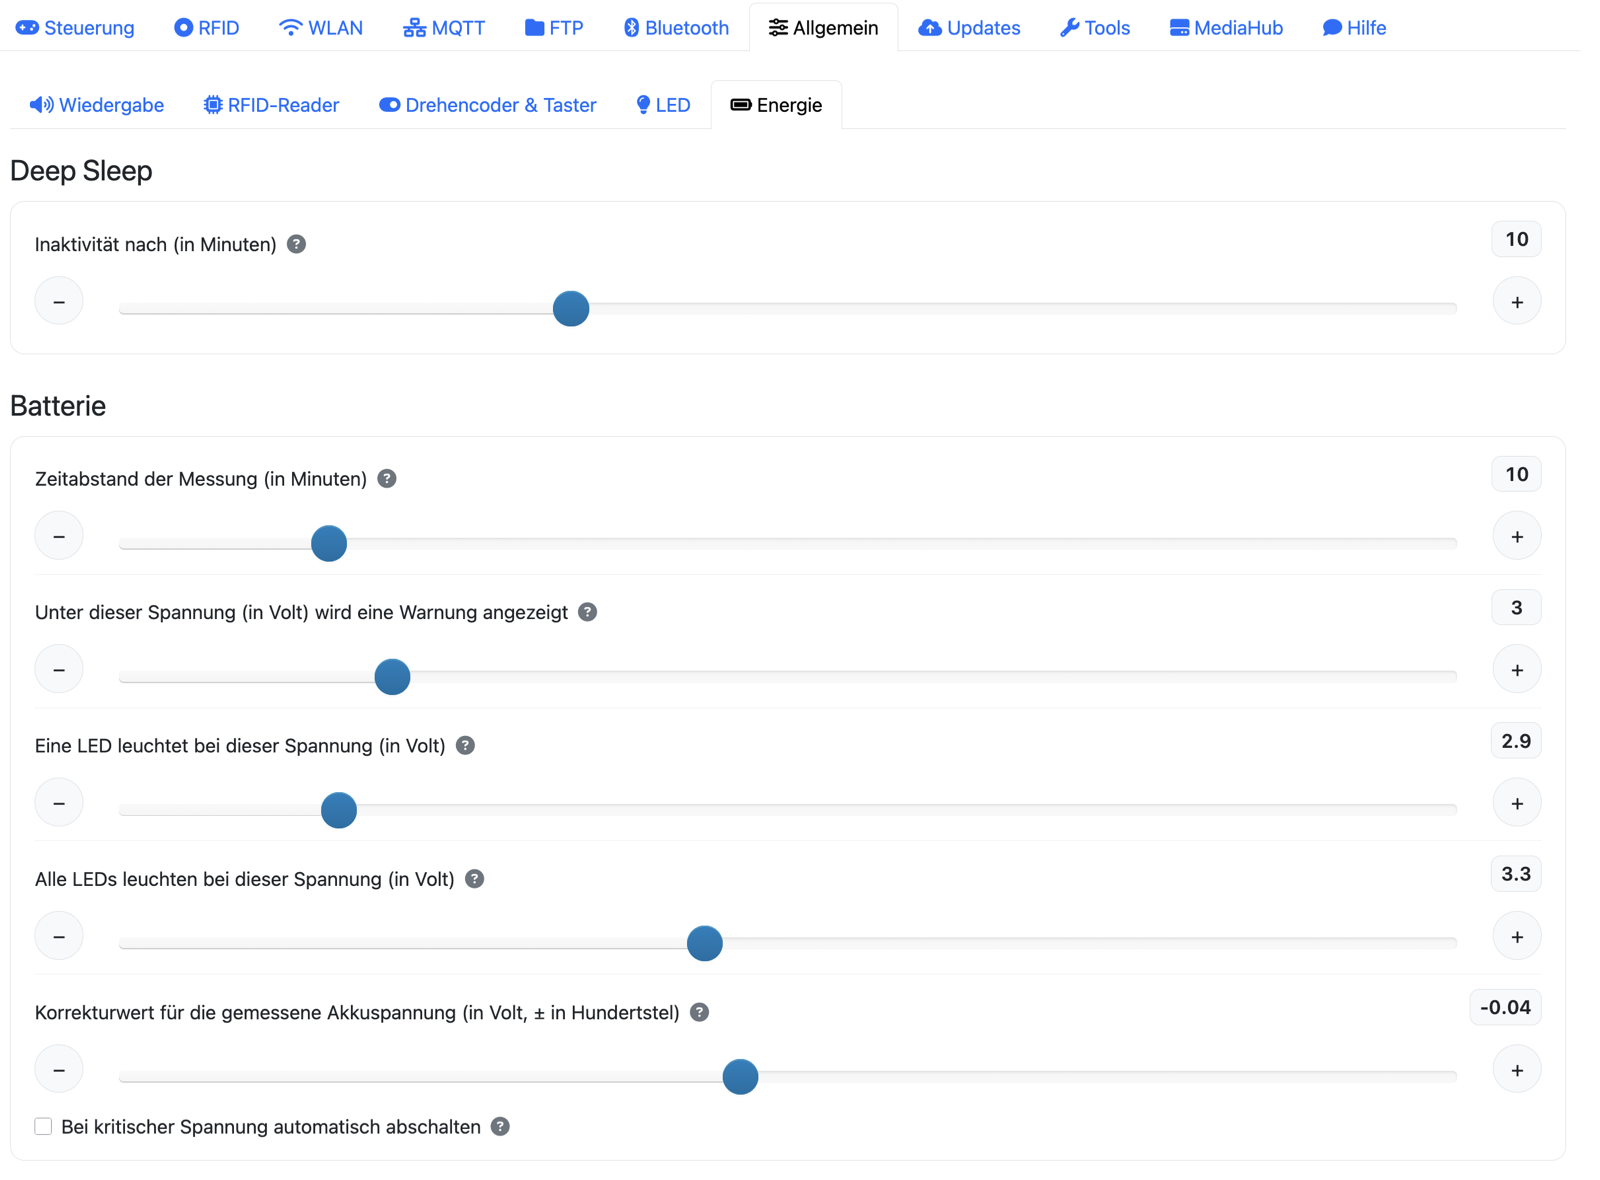
Under deep sleep, you set after how many minutes of inactivity ESPuino goes to sleep. If battery measurement is active, these values appear under battery:
| Setting | Meaning |
|---|---|
| Warning voltage | Below this voltage, the Neopixel warns of a low battery. |
| Voltage for 0% / 100% | Sets the bounds of the charge-level display (depends on battery type). |
| Critical shutdown voltage | Optional: ESPuino automatically shuts down below this. |
| Correction value | Fine correction of the measured voltage (± in hundredths of a volt). If the display deviates from a multimeter reading, enter the difference here. Details in chapter 5 · Fine-tuning. |
| Measurement interval | How often the battery voltage is measured. |
Updates tab
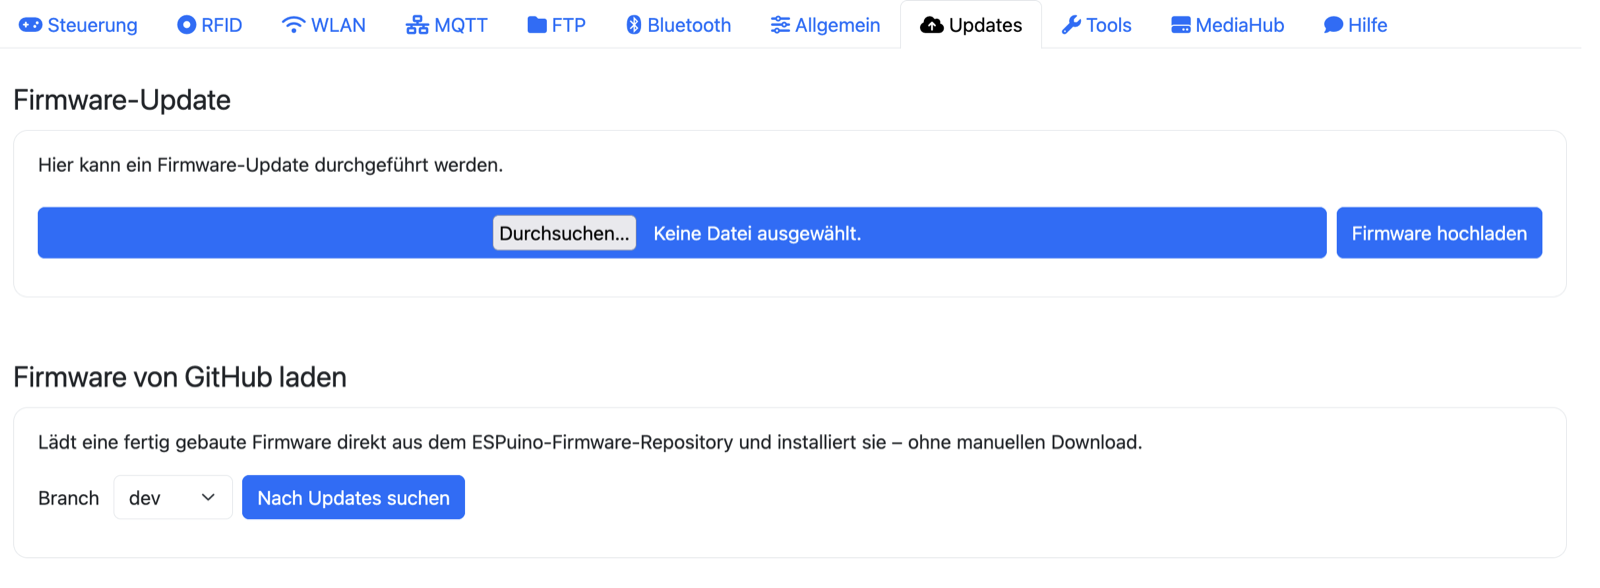
Here you'll find everything related to firmware updates. You can either upload a firmware.bin
manually, or – much more conveniently – fetch a ready-made build directly from the repository via
load firmware from GitHub. This is described in full detail in
chapter 13 · Updating the firmware. The GitHub section only appears
with OTA-capable firmware.
Tools tab
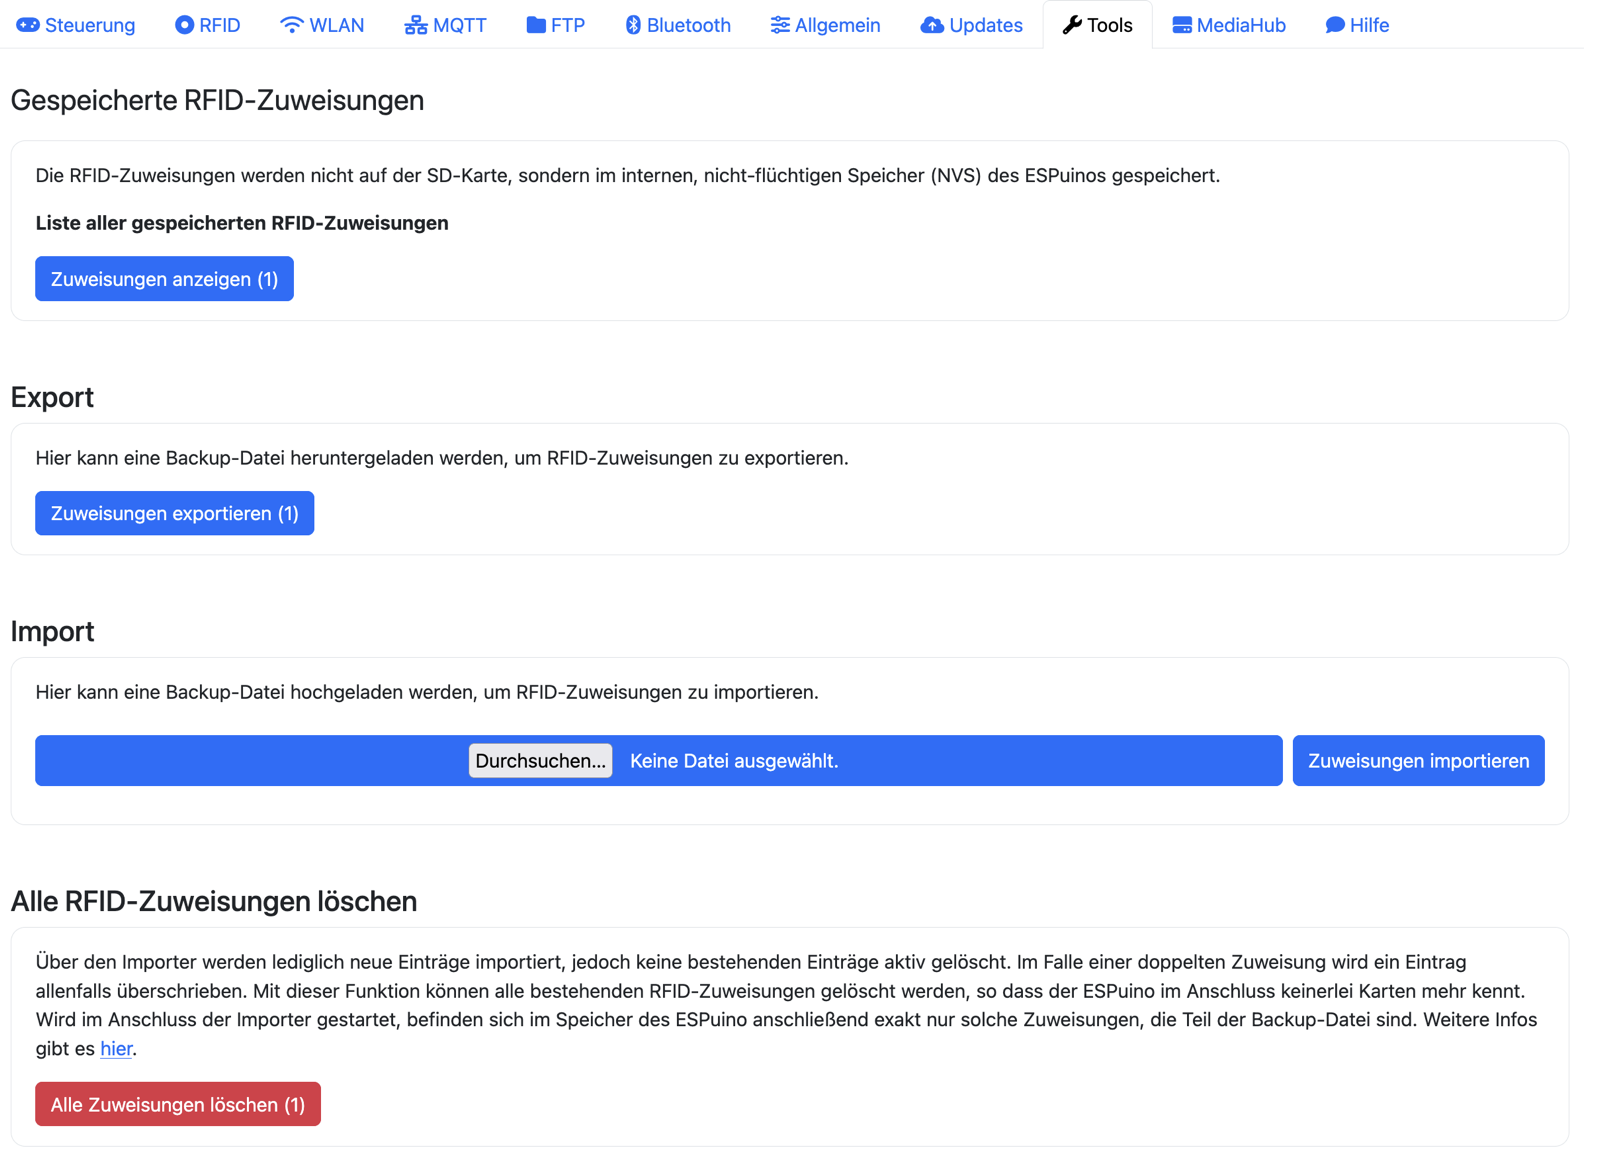
This tab is about the stored RFID assignments, which – worth a reminder – don't live on the SD card
but in internal memory (NVS). You can view all assignments (and delete individual ones
directly), export them as backup.txt and import them again (import only adds and
overwrites, never deletes), or use the red button to delete all assignments (with a
confirmation prompt). How to use these functions for backing up and transferring data is covered in
chapter 10 → Backup & restore.
MediaHub tab
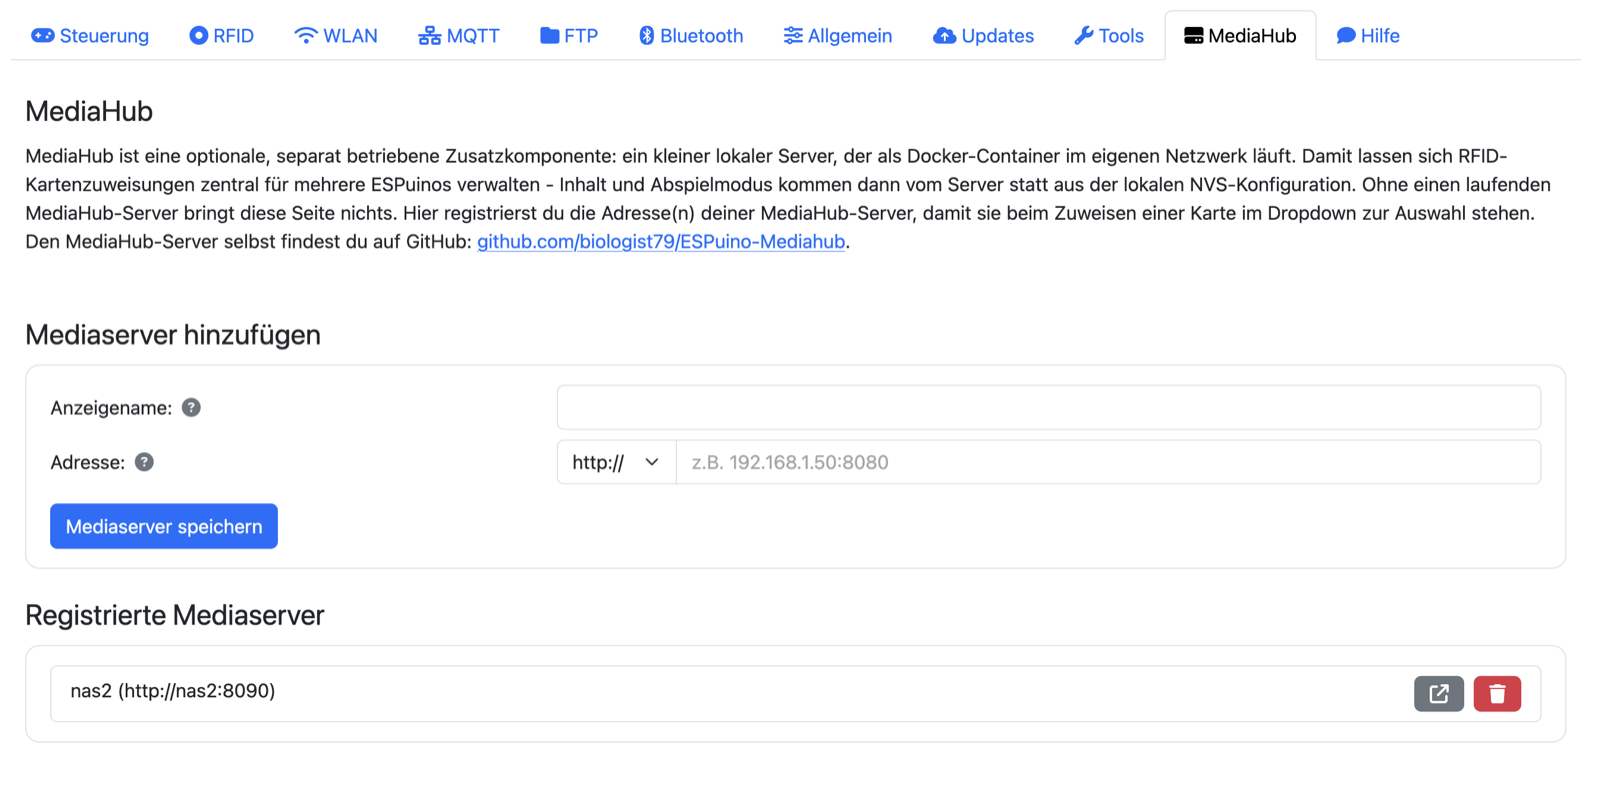
This tab is purely for managing server addresses – the actual card assignment still happens in the RFID tab. Without a running MediaHub server, this page doesn't do anything; what MediaHub is and how to set up the server is covered in chapter 11 · MediaHub.
Under add media server, you give it a freely chosen display name (this later shows up in
the dropdown when teaching a card) and the address – protocol (http:// or https://) via
dropdown, followed by host or IP plus port, e.g. 192.168.1.50:8080. Clicking "save media
server" adds it to the registered media servers list. From there, you can open it directly in
its own web interface via the icon, or remove it again via the trash icon – cards already taught
are unaffected and keep pointing at the previous server.
Help tab

The Help tab links to the forum and to the REST API documentation (Swagger) – the latter for anyone who wants to script ESPuino or integrate it into their home automation.